
Suspension. Clipless pedals. Gore Tex. Once in a while you buy something that turns out to revolutionise your cycling. We all have a small list of items, each of which – whether it helps you go faster, go further, stay more comfortable, or ride when and where you previously couldn’t – marks an epiphany in some way.
And when it comes to road riding or commuting, dyno lighting is at the top of my list.
Part one, in which I know why you think you don’t want dyno lighting
I didn’t, either. I liked battery lights. They were compact; they could be moved between bikes; they chucked out loads of light; they didn’t weigh much or cause any drag… what’s not to like?
Surely a dyno setup, on the other hand…
…is expensive? Depends what you’re comparing it to. A setup suited to fast rural riding at night will set you back about £150 or so, including a new wheel (examples below). That compares similarly or even favourably to most premium battery lights: the Exposure Strada, intended for similar use, is around £250. You can go cheaper, of course. A good bottle dynamo and front and rear commuter lights would set you back about £50.
…is heavy? Needn’t be the case. An SP dynohub and an B&M Cyo light is about 150g heavier than a Shimano 105 hub and Exposure Strada light (for less cost). Yes, it’s a bit more, but it’s not much (and if you were to add a piggyback battery to increase runtime, that difference would reduce or even reverse).
…is draggy? Well, naturally, nothing comes for free. You’ll lose a couple of watts of power with the lights off and half a dozen or so when they’re on (there are some charts in the CTC’s dyno feature). But I’ve never been able to discern any effect. Sure, don’t go time trialling with a dyno. But unless you’re bothered by the second hand on your watch, you won’t notice.
…stops when you stop? Nearly all dyno lights have standlights, which keep the light on for five or six minutes (the front light usually dims when on the standlight, but is still plenty visible). So no need to worry about being stopped at even the slowest of traffic lights.
…isn’t very bright? LEDs and dynamos are a match made in heaven, and it’s a match that’s getting better all the time as LEDs improve. Dyno lights do generally chuck out less light than the brightest battery lights, but here’s the thing: because they nearly all adhere to the German StVZO lighting regulations, they put that light only where it’s needed. Instead of simply vomiting photons in a cone shape, they use carefully shaped reflectors to place them on the road ahead. They send more light into the distance than the nearfield, too, to give more balanced illumination once the light reaches your eye. They are in essence miniature car headlamps, whilst battery lights are generally little more than very expensive torches. Putting aside the complexities of comparing beams, the bottom line is that £40 will get you a dyno light that’s plenty good enough to ride pretty much as fast as you like in the dead of night.
…can be easily stolen? The lights are bolted to the bike, so if you have to lock your bike up outside, the lights stay with it. A fair concern, but with commuter lights topping out at around £40 for both front and rear, and the black market for such lights being tiny, it seems an unlikely worry. A cable cutter and an allen key will let a thief take your bars and shifters in less time, and possibly your saddle and seatpost, too. Much easier to take, and to sell on, than some dyno lights.
…can’t easily be moved between bikes? Well, ok, that’s a fair cop, and one of the main reasons I was reluctant to move to a dyno. But if you’ve got the money for multiple bikes, the additional spend on the next dyno setup is just as rewarding as the first; I’ve ended up converting three bikes.
Part two, in which I evangelise about dyno lighting
OK, so hopefully there are fewer if any downsides to dyno lighting than you might think, but what’s great about it?
Well, dyno lighting…
…never runs out. Keep riding. Ride as long as you want. You’ve got light. Dawn turns out to be overcast? Keep ’em on. Sudden downpour? Keep ’em on. Patch of mist in a valley? Keep ’em on. You’re never caught short and you never need to be economical.
…never needs charging. Ever wanted to do a ride and realised your lights aren’t charged? Forget it. Pick your bike up and go.
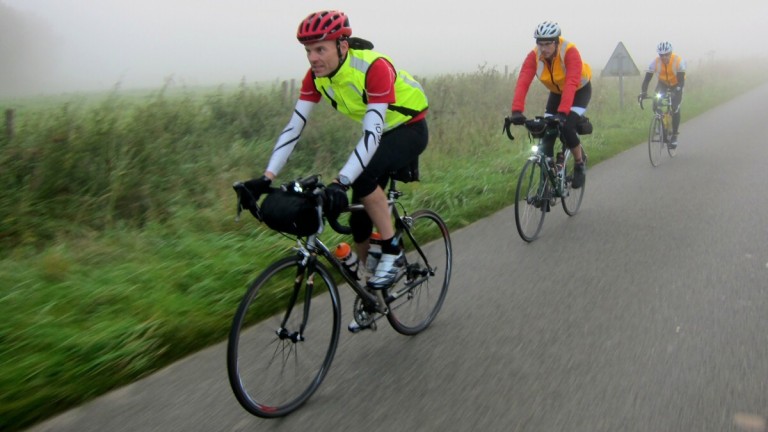
…doesn’t dazzle drivers. Nearly all dyno lights conform to StVZO regulations, meaning they have a proper dipped beam like a car headlight (don’t worry: as shown above, they’re still highly visible to other road users). One of my main reasons for turning to dynos was to get away from being main-beamed by drivers on rural roads; something which became more than just an irritation for me, it was a real safety issue. I don’t get main-beamed anymore.
…is always there. You know when you’re in a car and you’re sitting in traffic, and you see an eye-catching twinkle in your mirror? Maybe it’s a cyclist with lights filtering, who you’ve now been alerted to. I ride past half a mile of stationary traffic every evening, and I’m confident that people notice me in mirrors better with a light than without. Also, ever driven in and out of tree coverage on a bright day and noticed the sun on the windscreen severely affecting visibility? I’ll take whatever insurance I can against that, which is mainly a bright, always-on rear light. There are occasions when bright clothes are camouflage and there are occasions when reflective gear is of no use, but – barring you being perfectly eclipsed by the sun – lights work everywhere fabrics work plus everywhere they don’t. What’s more, my experience is that I seem to get fewer close passes, and far fewer people pulling out of side roads in front of me, when I’ve got lights on in any weather. Enough so that I just don’t like ever being without lights now.
…isn’t just for lighting! Once you’ve got a dyno, you can charge other kit. Some lights, like the B&M Luxos U have integrated USB output; or you can buy a separate device like Tout Terrain’s Plug or the B&M e-Werk, to feed your dyno output to all manner of electronic kit.
…frees you. You don’t need to remember your lights; they’re on the bike. You don’t need to remember to charge them. You don’t need to worry about switching modes to save power. You don’t need to think about what’s the right level of ambient light to have them on or off. You don’t have to think “I wish I had my lights” when you get caught in a downpour. You just ride a bike. Cycling is freedom, and the less faff there is the freer you are.
In short, you get all the benefits of having lights, all of the time, with none of the downsides and with none of the extra activity that goes into keeping them running.

Part three, in which I suggest some kit
These are just some ideas to get you started. I’ve habitually stuck to Shimano hubs and Busch & Müller lights as they’re the sweet spots on the bang/buck curves, but shop around. I’d recommend browsing round Peter White’s website for beam shots and all sorts of information on various lights. Note that most of these options are based on hub dynos, in which case you’d also need a rim (£20+) and spokes (£10+). The links are to Rose Bikes because – sorry, UK retailers – dyno kit is generally a lot cheaper in Germany, and Rose have good customer service.
The budget option (£44, no new wheel needed): Axa HR Traction bottle dynamo (£13), Axa Sprint front lamp (£16), B&M Secula Plus rear lamp (£13).
The commuter setup (£59): Shimano 3N31 hub (£25), B&M Lyt Senso Plus front lamp (£21), B&M Secula Plus rear lamp (£13).
The audax setup (£107): Shimano 3N80 hub (£50), B&M Cyo Premium T Senso Plus front lamp (£44), B&M Secula Plus rear lamp (£13).
The epic setup (£169): Shimano XT Disc hub (£59), B&M Luxos U front lamp (£97), B&M Secula Plus rear lamp (£13).
The off-road setup (£260+): Exposure Revo pack (£252) plus any old battery rear light.
So, assuming a wheelbuild of about £40 or so, that gives you a bunch of options from £50 to £200 in £50 steps, plus the unique Revo. Plenty of choice.
Part four, in which I apologise
No-one likes an evangelist. And dynamo users tend to be evangelists. But, really, there is a good reason. The joy of simply getting lighting nailed in one go, and never having to worry about it again, is quite something. The freedom of always having light is liberating, no matter whether you ride frequently or far, or both – or even if you’re just forgetful when it comes to charging.
To infinity – and beyond!

For me, it didn’t work out. The wiring of my dynamo lights was always coming loose as I bounced over horrendously rough cobbles in town and horrendously rough unpaved rural cycle routes in the country (the joys of cycling in Germany!). I bought a cheap battery thingy on ebay last Autumn (along with a set of thick studded tyres) and had my best cycling winter ever. I tend to carry panniers full of tonnes of stuff around with me in winter anyway (extra layers, changes of clothes, flasks of tea and coffee and the like) so it’s not any great hassle for me to keep a selection of spare lights and extra batteries handy as well.
Strange. My connectors are all pretty firm; very hard to imagine any of them coming loose under any circumstances.
I should probably make another attempt soon with more up-to-date technology. I bought the bike with the dodgy wiring secondhand in 2008 on my first day in a new job in a new town. Walking to work just didn’t feel right, and I only managed about two hundred yards before randomly diving into a bike shop and emerging with THE TANK, 20 kg or so of rock-solid but distinctly old-fashioned German bike technology (retrofitting a Shimano dynamo hub does not a 21st century bicycle make.) In principle I do “get” your evangelism (and thanks for the excellent sketch of all the options).
It’s important to secure the wires leading to/from devices. Ride vibration (especially on crappy roads) is the only source of failure for my home-made lighting. What appears to work best is stuff called “helicopter tape” which you use to hold the entire length of the wire down. Duct tape would also work, and perhaps make your bike somewhat less attractive to theft :-).
I used to use zip ties, and had a wire fail because the unsupported bits on either side of the zip tie waggled and waggled till the wire broke in the middle.
Understand, I ride on very crap New England roads, back when I used a sidewall dynamo I had a bracket crack clean in half.
Home-made lighting is what you use for your kid’s bikes — I’ve had two systems stolen (along with the bikes) because of insufficiently diligent kid-locking. I deal with the beam shaping by mounting the symmetrical lense directly under an acrylic mirror, which chops off most of the top part of the beam (it’s not shaped to throw as much light downroad, but I don’t get high-beamed).
Another good site (probably about the best I have come across) with lots of information and reviews about different dynamos and lights is http://swhs.home.xs4all.nl/fiets/tests/verlichting/index_en.html
Dynamos rock, especially hub generators. It is just a shame that most UK consumers seem to think they are still stuck in the bad old days of the ultra cheap Union bottle dynamos which had all the resistance of a pallet of bricks.
If you are not prissy about the rim (and on most all-year commuters with rim brakes they’ll not last that long) a good option can be to purchase a ready built wheel online from the Netherlands or Germany. My 20″ with a Shimano 3N31 was less than £30 (noticably cheaper than just the UK price for the dyno.
Using good quality cable (really cheap cable can corrode & tarnish) and ensuring you have the right size connectors which are nipped snug helps with reliable connections. For the ultimate, then soldering up the connections is bombproof.
As for fitting dynos and lights, a dyno-shoe that bolts onto V-brake mounts is a good neat & secure solution for bottle dynamos and saves having to use the ugly brackets most come with.
My rear rack has a reflector bracket with the two vertical holes. After much searching I found that Topeak make a neat bracket which converts & enables it to take an 80mm mounting rear light, and surprisingly the easiest place to get one of these was Halfords for a couple of quid.
Yet another blog? I’ll bet you’re really Keith Peat as well.
I’m very happy with my dynamo setup, though from what I read here, I may have spent more than I needed to.
One blog for cycling as a pastime, one for trying to dismantle untenable views about road use – I didn’t want to mix them :)
I went for Axa HR with Axa Pico Steady (30 lux instead of the sprint’s 20) and Axa Riff Steady (rack-mount, cheaper than your suggestion) which I think was about £45 from Bike-Discount. I did pay another £5 for a V-brake mount and £5 postage from Really Useful Bikes because my bike had no suitable mounting point on the fork, though.
One small warning if you’ve a small-wheeled bike: I think UK rear lights are meant to be over 350mm above the road, so you probably should pick a rack- or seatpost-mounted light, rather than a mudguard one.
Another note: I think the HR/Pico/Riff setup is OK for reasonably fast riding on unlit country roads but I remember using EverReady Frontguard/Rearguard lights (which definitely were NOT… 10mph was risky!)
A tip for reducing wire breakage is to encase the entire length of the cable in heat shrink before mounting it on the bike. It dramatically strengthens the cable and reduces, if not eliminates, cable fatigue. 5mm diameter, adhesive lined heat shrink is what you want.
An alternative to the Exposure Revo (and better built that the Revo) for off road use is a light system from http://www.klite.com.au/. Kerry has been making dedicated dynamo powered off-road lights for years and they are, arguably, the best in the world.